How to Add Passive Security to Your Bicycle
- Jianhan Wang
- Mar 26, 2018
- 5 min read
Updated: Nov 5, 2021
It seems like there are only a few options in bikes available in the US market for people primarily choosing to ride for transportation and take steps to address bike security compared to the vast majority of bikes available that are intended for sport and recreational use, despite high rates of bike theft. However, there are several solutions that can help you increase the security of your bike and lower its risk of theft without needing additional effort with every ride which I’ll define as passive security. Conversely, active security requires you to do something every ride, such as carrying a U-lock or parking your bike in a locker.
Assuming you don’t get to park your bike indoors safely without needing a lock and/or in a secure locker at all of the places you ride to, here are several benefits to increasing passive security on your bike:
Potentially lowering the number of locks you need to carry to 1 (comes with anti-theft skewers).
Lowering effort and time needed to lock your bike, especially when you get to the point of needing to carry just 1 strong lock.
Security for bicycle parts aside from the wheels and frame of your bike including:
Saddles
Seat posts
Handlebars
Lights
Less worrying about your bike by lowering your risk to theft.
If that sounds great to you, you might be wondering, “How can I make that happen?”
The secret is to get to a point where only you and those you approve of with your bike can (relatively easily) disassemble/assemble different parts of your bike. Others would find it very difficult without damaging your bike, which is not really beneficial for thieves to do.
1. Replace Your Skewers
The most valuable parts of your bicycle are the frame and wheels. Skewers hold the wheels to the frame, so replacing them with tamper-resistant ones would be first in the priority order. They usually come with custom keys for you to access them with.

Pitlock skewer holding the rear wheel to the frame on my bicycle.
2. Secure Your Seat
Moving on to seats, there are a few different ways to help secure it.
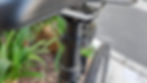
One way is to use a seat “leash”.

A combination cable lock being used to keep the saddle tethered to the frame.
It’s essentially a lock thin enough fit through the saddle and link it to the frame of your bike. You can usually use a cable lock or an anti-rust chain as deterrents. If the gap between your saddle bars and the saddle cushion is wide enough, you might be able to fit a U-lock through as well.
The two methods involve two points you want to focus on to secure it in the fill-in or replacement method (which we will get to in detail in a moment in #3) - the seat clamp (holds your seatpost, the height adjustable part, to your bike frame) and the screw that holds the saddle to your seatpost.
If you have a quick release seatpost clamp, replace it with one that requires an uncommon or unique key to install or adjust. If you need to replace it with one that is accessible by a hex or Allen key, then be sure to fill the screw head in.
We will explore that down below to help keep your seatpost clamp as well as your seat and other parts of your bike attached by screws and bolts with commonly used heads.
3. Fill or Replace Bolts, Nuts, and Screws with Commonly Used Heads
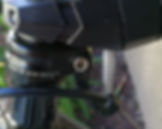
In the center is an Allen or hex key screw as part of a seat clamp.
When tackling Allen or hex key screws, either fill them in or replace as many as you find parts that they hold together valuable to protect. They are found on, but not limited to, seat posts, saddle mounts, and handlebar mounts.
You can fill them in through a variety of ways - wax, hot glue, supergluing ball bearings, Hexlox, etc. Just make sure it doesn’t come out easily from picking at it without a special tool (should take over 1 minute), but not to the extreme where you or your local bike shop can't get it out without breaking and replacing it, unless you are fine with that. Be aware that this method can still leave some screws that stick outwards vulnerable to vise grips and can be a hassle to deal with when it comes to you doing adjustments on your bike.

Using Hexlox to fill in the Allen or hex key screwhead.
The replacement method involves replacing the screw or bolt with another one that interfaces with a less common or custom tool or key. The special key is the same key that can access all of your other less common or custom screws.
Ideally, the custom bolts would also not have flat surfaces in the perpendicular plane so that vise grips won’t be able to remove them. Several companies like BicycleBolts and Pitlock sell these screws and bolts to bicyclists. You can look into ones that are appropriately sized for your bike or simply the size of the screw(s)/bolt(s) they will be replacing.
These two methods may also apply to other bolts and nuts with common heads like a Phillip’s head which is commonly found on light mounts and reflector mounts.
Screws with less common head drives for holding a rear light to the seat.
4. Securing Your Accessories
As for accessories, you might be successful just following tip #3 in filling or replacing the screws.
If any of this seems too difficult or undesirable for you to complete by yourself, you can ask a friend or your local bike shop for help. The more layers of security that your bike has, the lower its risk of theft.
The last thing to keep in mind is that no matter what form of security you add to your bike, the risk of theft is never 0%, much like for other belongings of yours, and can greatly vary depending on your location. The goal is to lower it to a point to where you don’t have to actively think about it every time like with your belongings at home.
To protect against losses in the unfortunate event that some part or all of your bike gets stolen, definitely register your bike on a registry like BikeIndex, 529 Garage, and your bike manufacturer's registry (they’re free!) and consider insuring it via homeowner's or renter's insurance.
If you found this helpful, please share this with others who bike!
You can send any comments and questions to us at hello@cyclescp.com
We would love to hear your thoughts and what worked well for you.
If you would like to go deeper with others in your organization and have me help in a live setting and practice good locking and parking behavior together, check out my bike security workshop. It can help save them hundreds, if not thousands, of dollars each, reduce solo driving, and reduce friction from undesirable bike parking behavior.